

EMF Shielding: A Practical Guide to Reducing EM Radiation in Your Home
A primer on how to quickly and effectively reduce EMF in your home.

Introduction
In my previous article on water shielding, I found my initial attempt was quite ineffective on its own — because I was ignoring the single biggest entry point for electromagnetic radiation in most homes: the windows.
This article corrects that oversight, and establishes a principle I should have emphasised from the start: any claims about reducing EMF exposure should be backed by real, measurable results. Not feelings, not guesses — actual readings from actual instruments.
Understanding the Numbers: What Does dB Actually Mean?
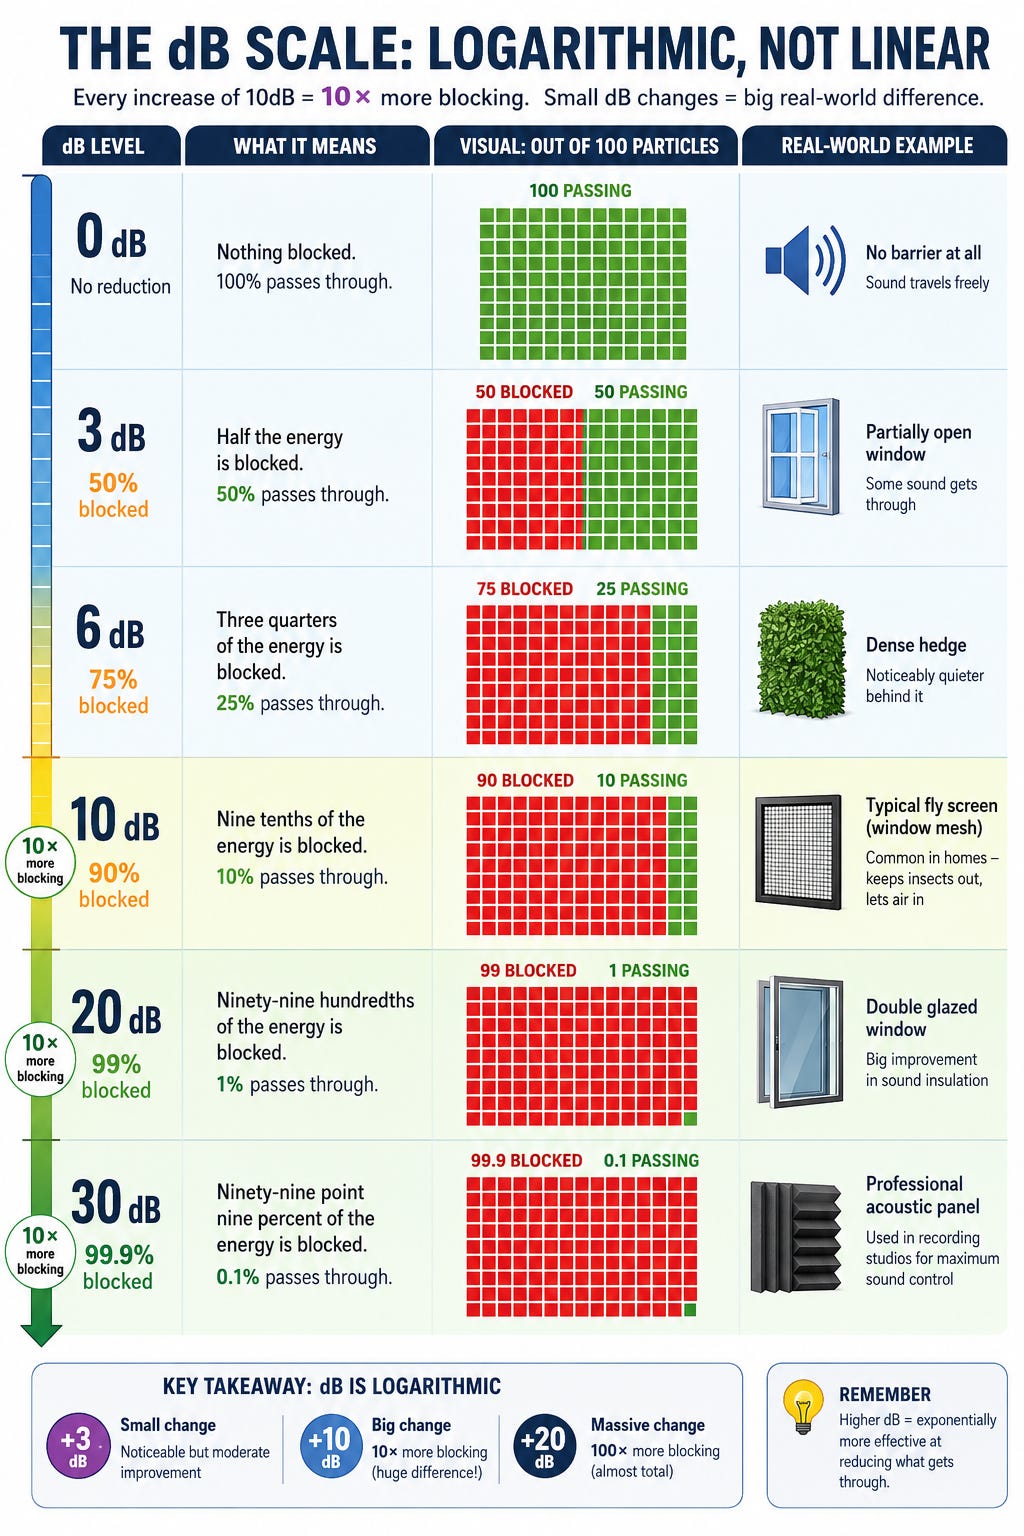
Decibels use a logarithmic scale — each step is a multiplication, not an addition. A 3 dB reduction removes half the power. At 10 dB you’ve blocked 90% of the signal. At 20 dB, 99% is gone. At 30 dB you’re at near-complete suppression — 99.9% blocked. These are not incremental steps; each jump represents an order-of-magnitude change in what’s reaching you.
How to Measure: You Need Real Numbers
Before spending anything on shielding materials, you need a way to verify that what you’re doing actually works. There are three practical options at different price points.
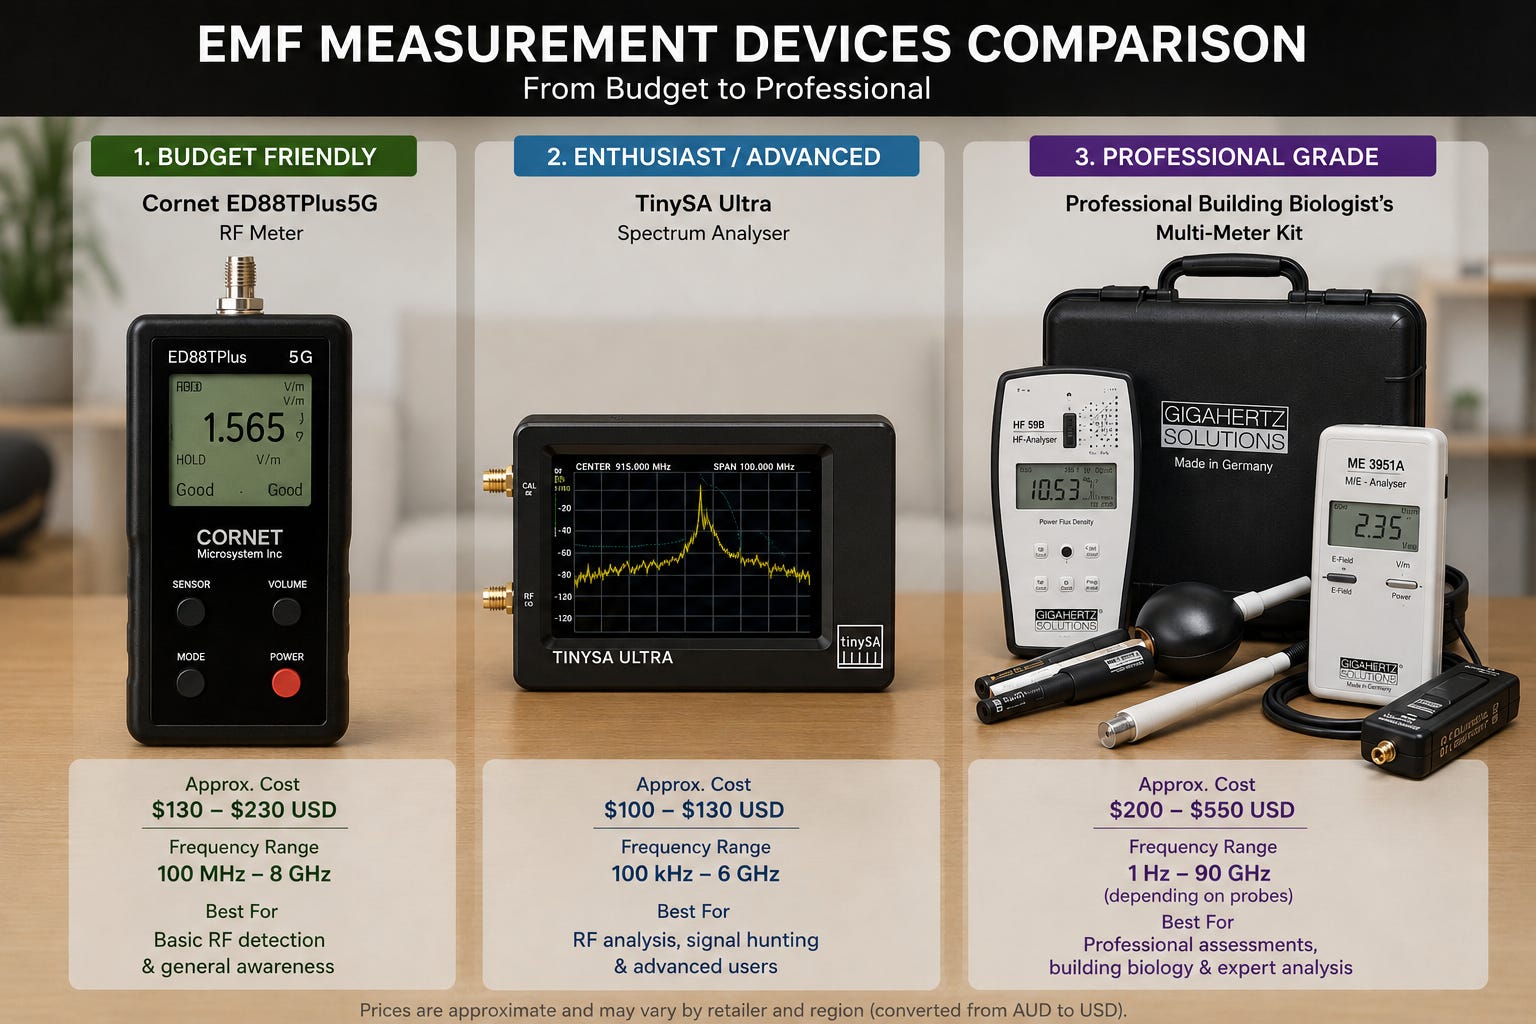
At the budget end, the Cornet ED88TPlus5G (~$130–230 USD) covers 100 MHz to 8 GHz, capturing 4G and sub-6GHz 5G bands. It’s widely used in the building biology community and more than adequate for residential assessment. A step up, the TinySA Ultra (~$100–130 USD) is a handheld spectrum analyser that lets you see exactly which frequencies are present and at what strength — particularly useful for identifying which cell tower bands are driving your readings. At the top end, a qualified building biologist (~$200–550 USD) brings calibrated equipment and delivers a formal report.
Measurement protocol — do this every time:
Mark your measurement spot and return to it each session
Record date and time — tower output varies through the day
Measure before AND after each intervention
Allow the environment to settle before measuring
Why Your Walls Are Already Working For You
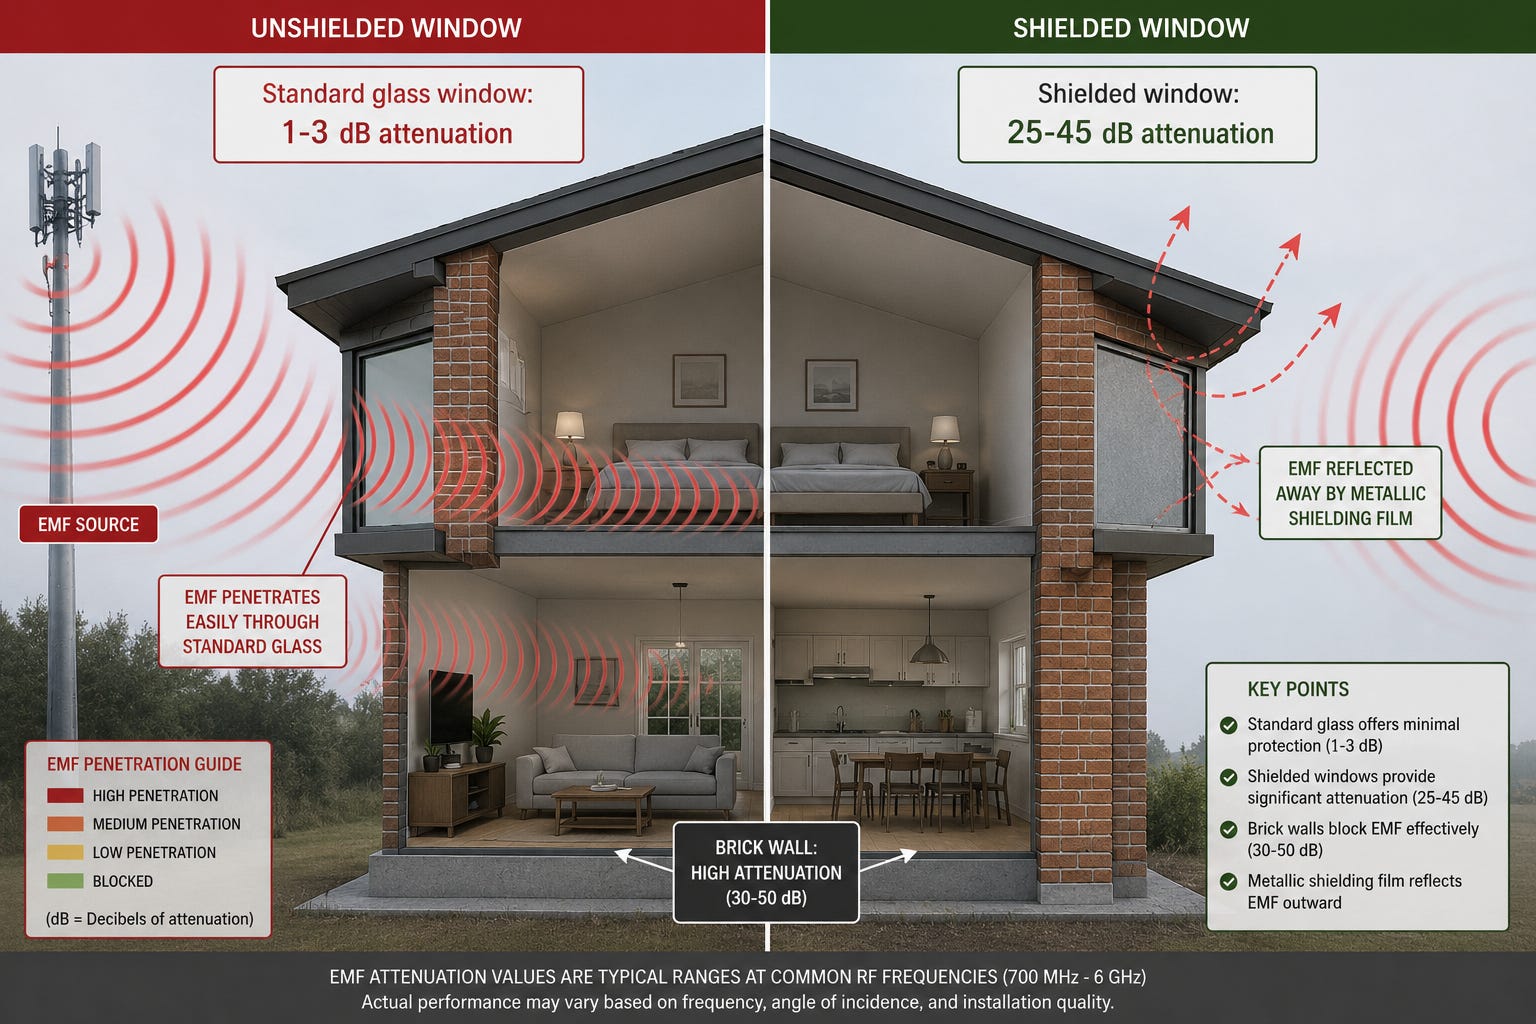
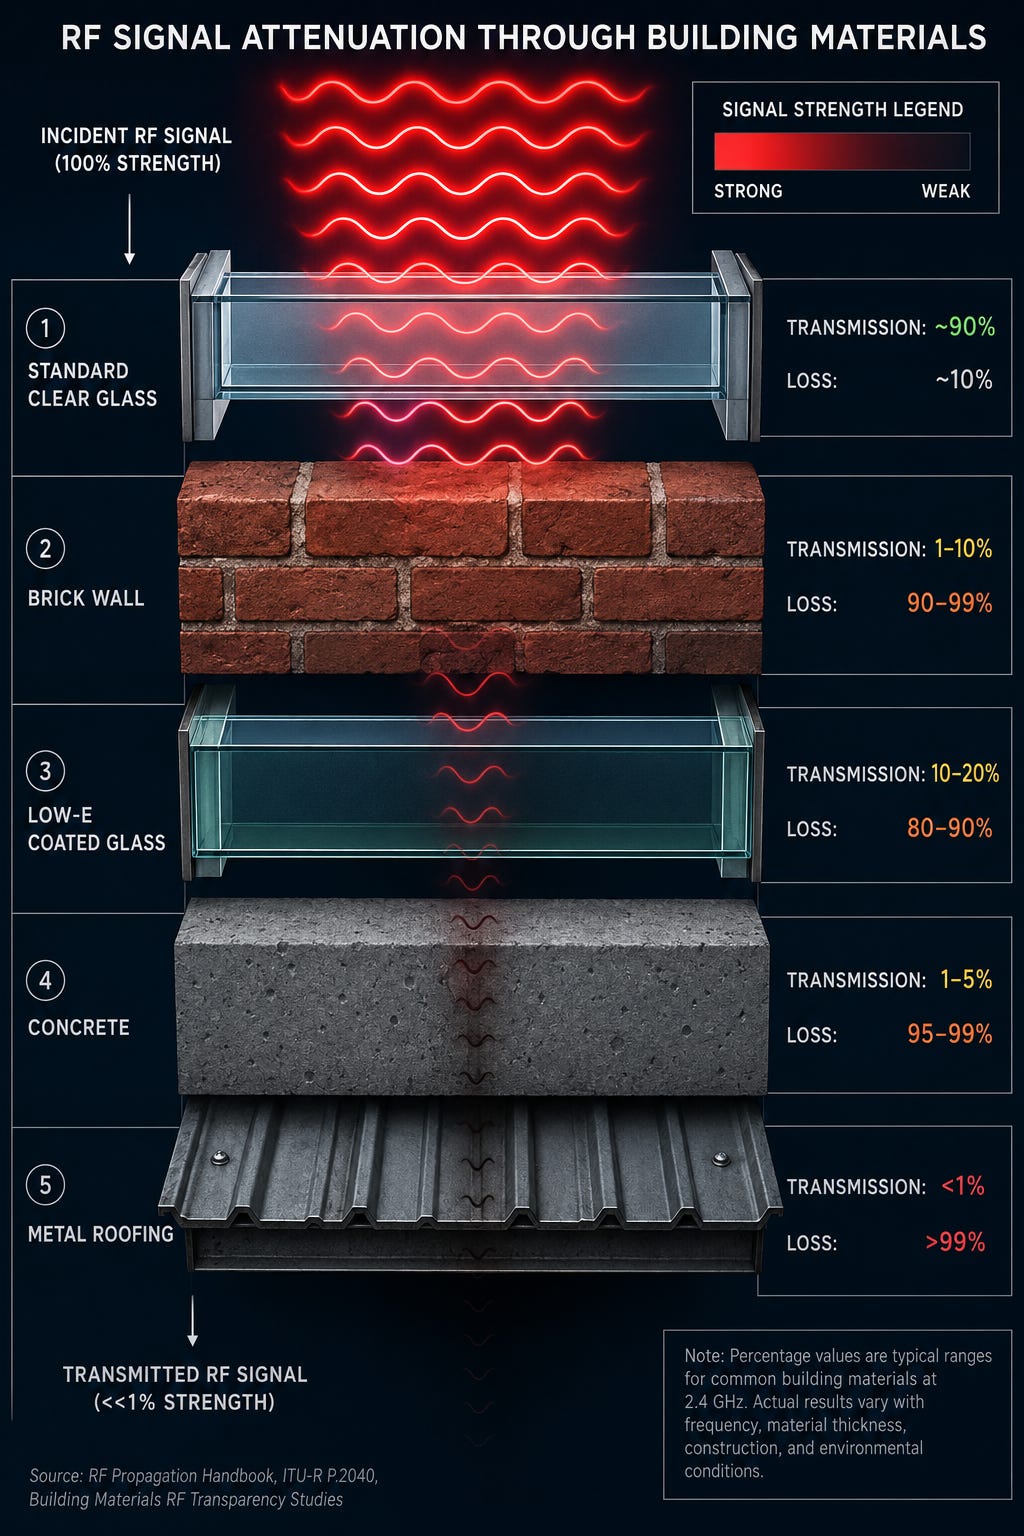
Most people living in brick, brick veneer, or concrete homes already have significant natural attenuation built into their walls — they just don’t know it. Double brick walls typically absorb 12–25 dB at common cellular frequencies, and even single brick provides 6–12 dB. Concrete is similar. Weatherboard and timber frames are weaker at 2–5 dB, but still provide some protection.
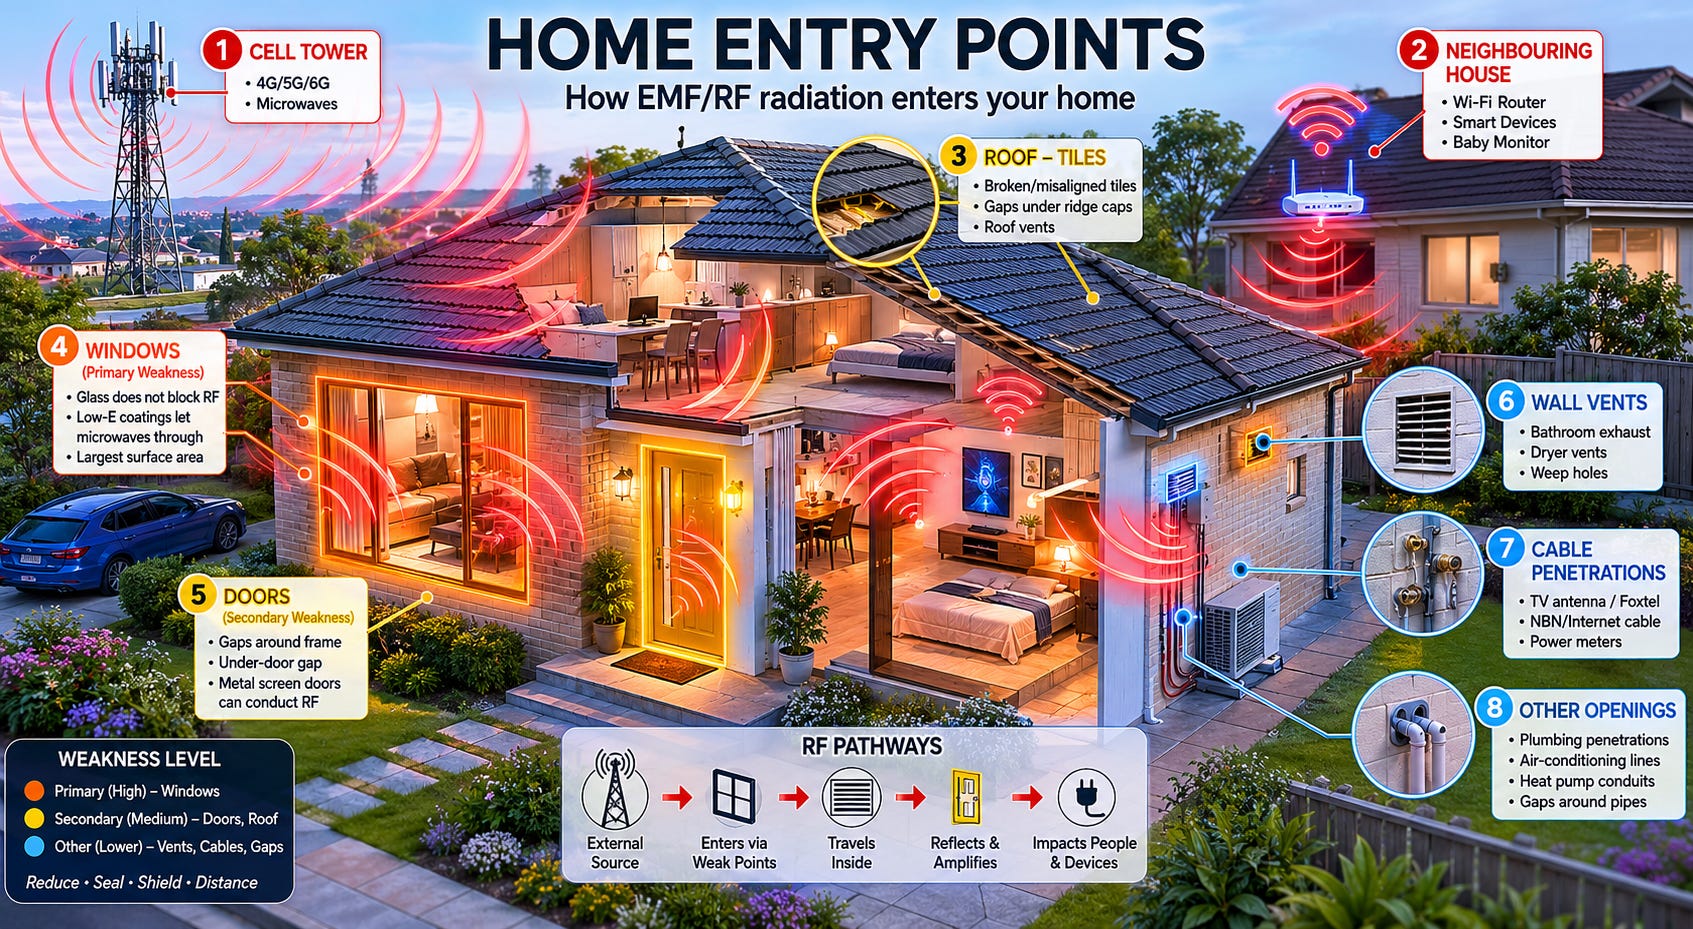
Then there’s standard glass. A single-pane window offers just 1–3 dB. That means your windows are letting through 10 to 100 times more RF energy than the surrounding wall. They are, quite literally, holes in your shield.
Sources: ITU-R P.2040-2 (2022); Ofcom UK building penetration studies; NIST TN 1550.
The windows are the problem. Everything else is secondary until they’re addressed.
Window Shielding Options
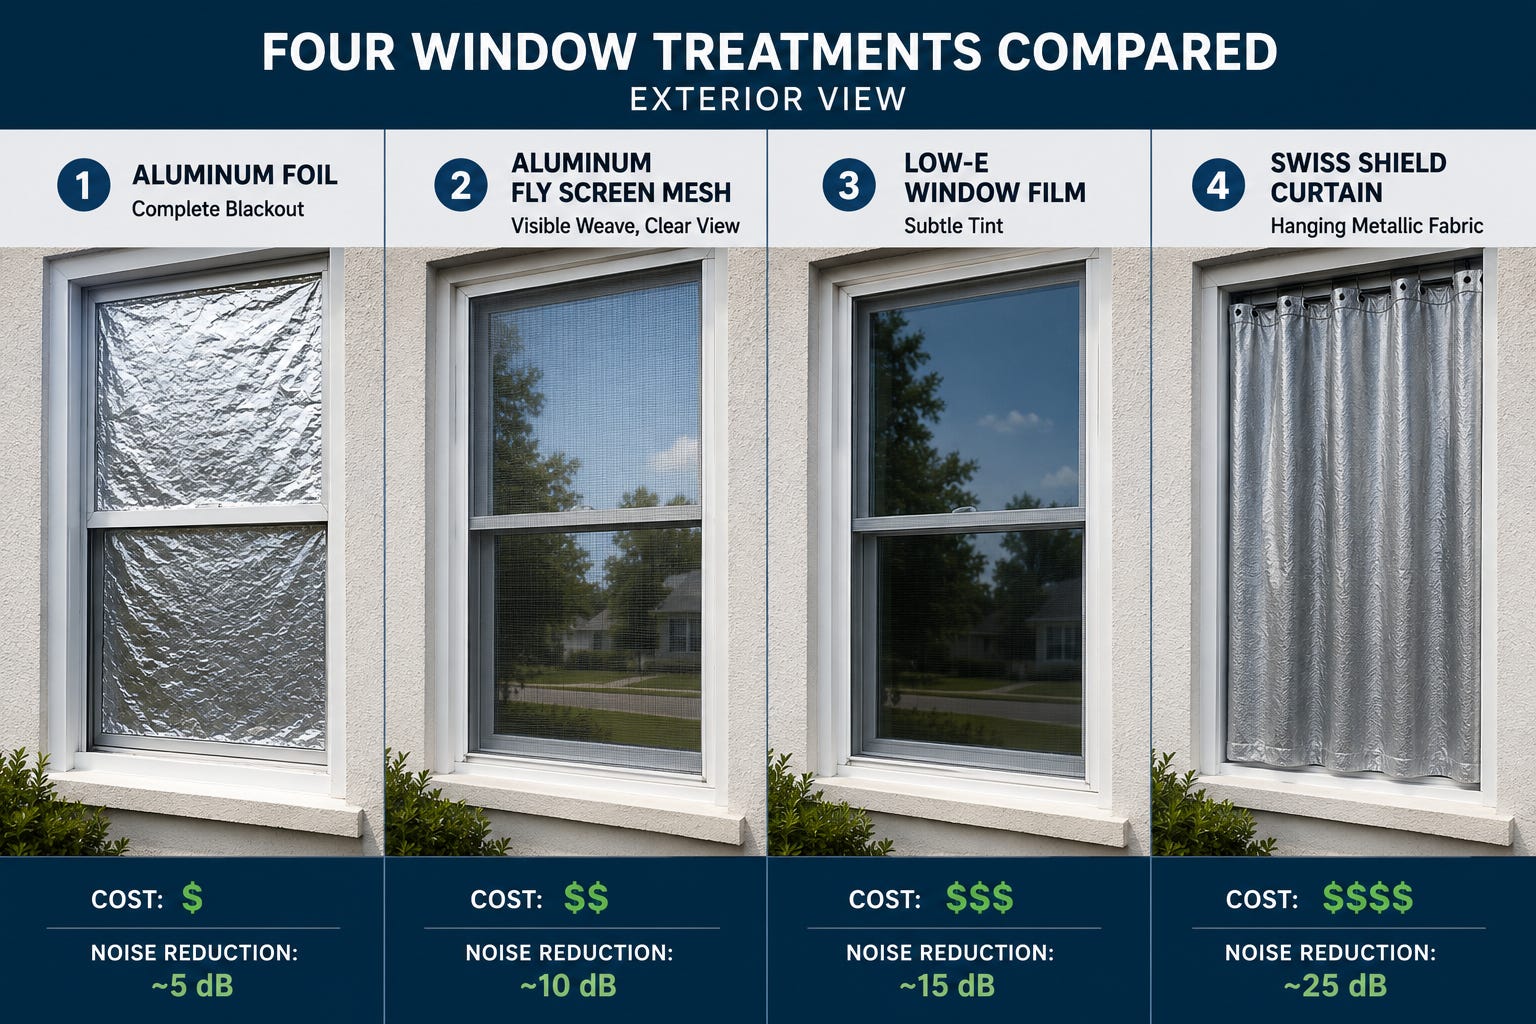
Option 1: Aluminum Foil — The Quick Test
Dirt cheap (~$3–7 per window) and highly effective at 40–80+ dB across most frequencies, but it’s a complete blackout. Its real value is diagnostic: tape it up, take a measurement, confirm the windows are your primary problem, then invest in something liveable.
Option 2: Aluminum Fly Screen Mesh — Best Budget Permanent Solution
Standard fly screen mesh with 1.2–1.5mm apertures is the workhorse option. It shields because the holes are far smaller than the wavelengths involved — at 700 MHz the mesh is delivering 30–50 dB of attenuation. Performance steps down as frequency rises, but remains meaningful across all the cellular and Wi-Fi bands that matter most in typical residential environments. At 5G mmWave frequencies (26–28 GHz), effectiveness drops off significantly, though mmWave has very limited range and rarely penetrates buildings even without shielding.
Sources: Leferink et al. (2006); Celozzi, Araneo & Lovat (2008), Electromagnetic Shielding (Wiley); IEEE Std 299-2006; published data from YSHIELD, Swiss Shield.
The mesh attenuates but doesn’t eliminate — you are reducing exposure, not building a Faraday cage.
My results so far:
With only partial window shielding applied — two windows in one room fitted with aluminum fly screen mesh, while other windows and the door remained unshielded — I measured a 10–15 dB reduction in RF field strength in that room. That translates to 90–97% less energy getting through compared to baseline. Not bad for a couple of mesh screens and an afternoon’s work.
But here’s the important caveat: partial shielding has a ceiling. The unshielded windows and door are still open paths, and signal will flow through the path of least resistance. To understand what’s achievable with a more complete approach, you need to think about the room as an enclosure.
What full envelope shielding could achieve:
In a brick or concrete building, the walls are already doing significant work — typically 10–25 dB of natural attenuation. If you additionally shield all windows, all external-facing doors, and seal vents and penetrations, you are closing off the remaining easy entry points. Under those conditions, a 20 dB or better reduction (99% or more) becomes realistic.
The critical qualifier is your internal walls. If your home has brick or concrete internal walls between rooms, those walls will contain the shielded zone effectively — signal from unshielded parts of the house won’t bleed through. If your internal walls are lightweight timber or plasterboard (as they are in most modern homes), signal from adjacent rooms or hallways can partially undermine your shielded space, and you may need to address doorways as well.
The practical conclusion: shielding one room properly — all external windows, doors, and vents — in a masonry home is the most achievable path to a 20 dB+ result without treating the entire building envelope.
Option 3: Purpose-Built EMF Shielding Film
Metallic films using thin silver, copper, or aluminum layers on a polyester substrate. Several manufacturers publish independently tested data, and the performance numbers are credible — YSHIELD’s HSF74, for example, delivers 45 dB at 1 GHz while still transmitting about 25% of visible light. Signals Defence products are also specified for government SCIF facilities (classified information environments), which provides an additional credibility layer beyond consumer marketing claims.
Sources: YSHIELD GmbH and Swiss Shield AG published test data (ASTM D4935-10); Signals Defence LLC (IEEE 299-2006 methodology).
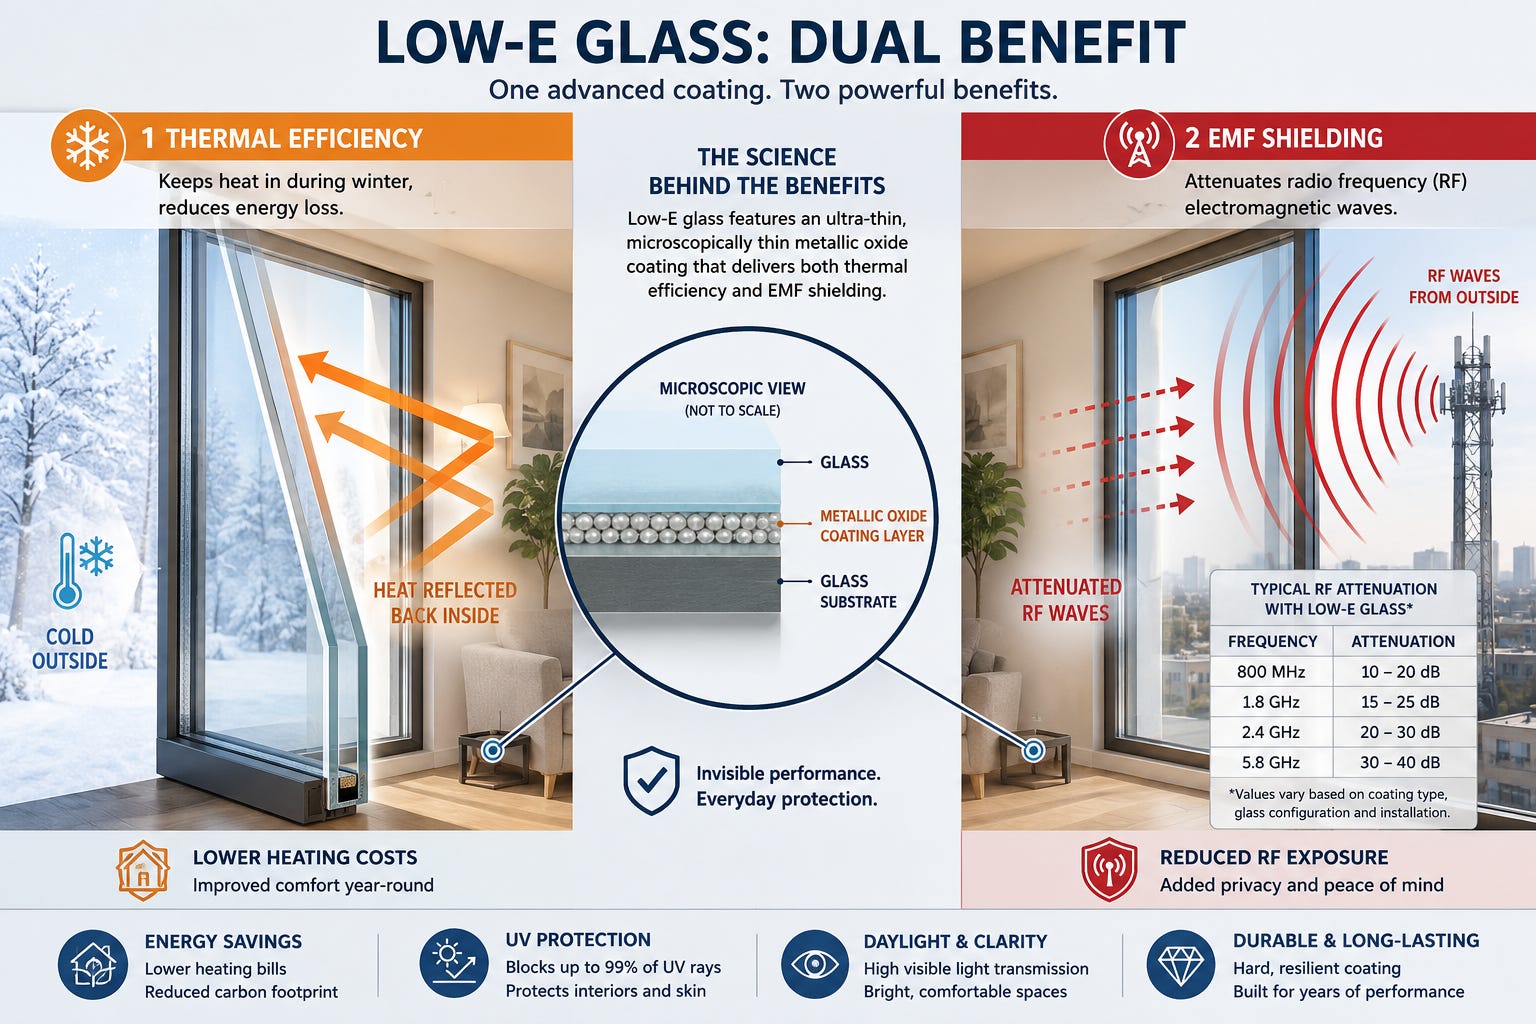
Option 4: Low-E Glass and Film — The Hidden Bonus
This is something many people overlook. Low-E (low-emissivity) glass and film — designed purely for thermal efficiency — also provides meaningful RF attenuation as a side effect of its metallic coating layers.
Low-E coatings work by depositing microscopically thin metallic oxides (silver, tin oxide, zinc oxide) onto the glass surface to reflect infrared radiation. But those metallic layers don’t discriminate — they also attenuate radio frequencies. A standard Low-E double glazed unit can deliver 20–40 dB at 1 GHz, comparable to dedicated EMF products, simply because of the physics of its thermal coating.
Sources: Ofcom (2014); NIST TN 1550 (Stone, 1997); Rodriguez et al. (2014), Aalborg University; ITU-R P.2040-2 (2022).
The practical implication: if you’re already planning a window upgrade for energy efficiency or comfort, specifying Low-E glass gives you substantial EMF reduction at no additional cost. Mainstream window tinting companies will install Low-E retrofit film — you don’t need to source specialty EMF products or explain what you’re doing.
How the Options Stack Up
Across cost, attenuation, light transmission, airflow, and durability, each option occupies a different niche. Aluminum foil is an effective diagnostic tool but unliveable long-term. Fly screen mesh is the best budget permanent solution and the only option that maintains full airflow. Purpose-built films maximise attenuation while keeping some visibility. Low-E film doubles as a thermal upgrade. Swiss Shield fabric is the renter-friendly option — no permanent modification, take it with you when you move.
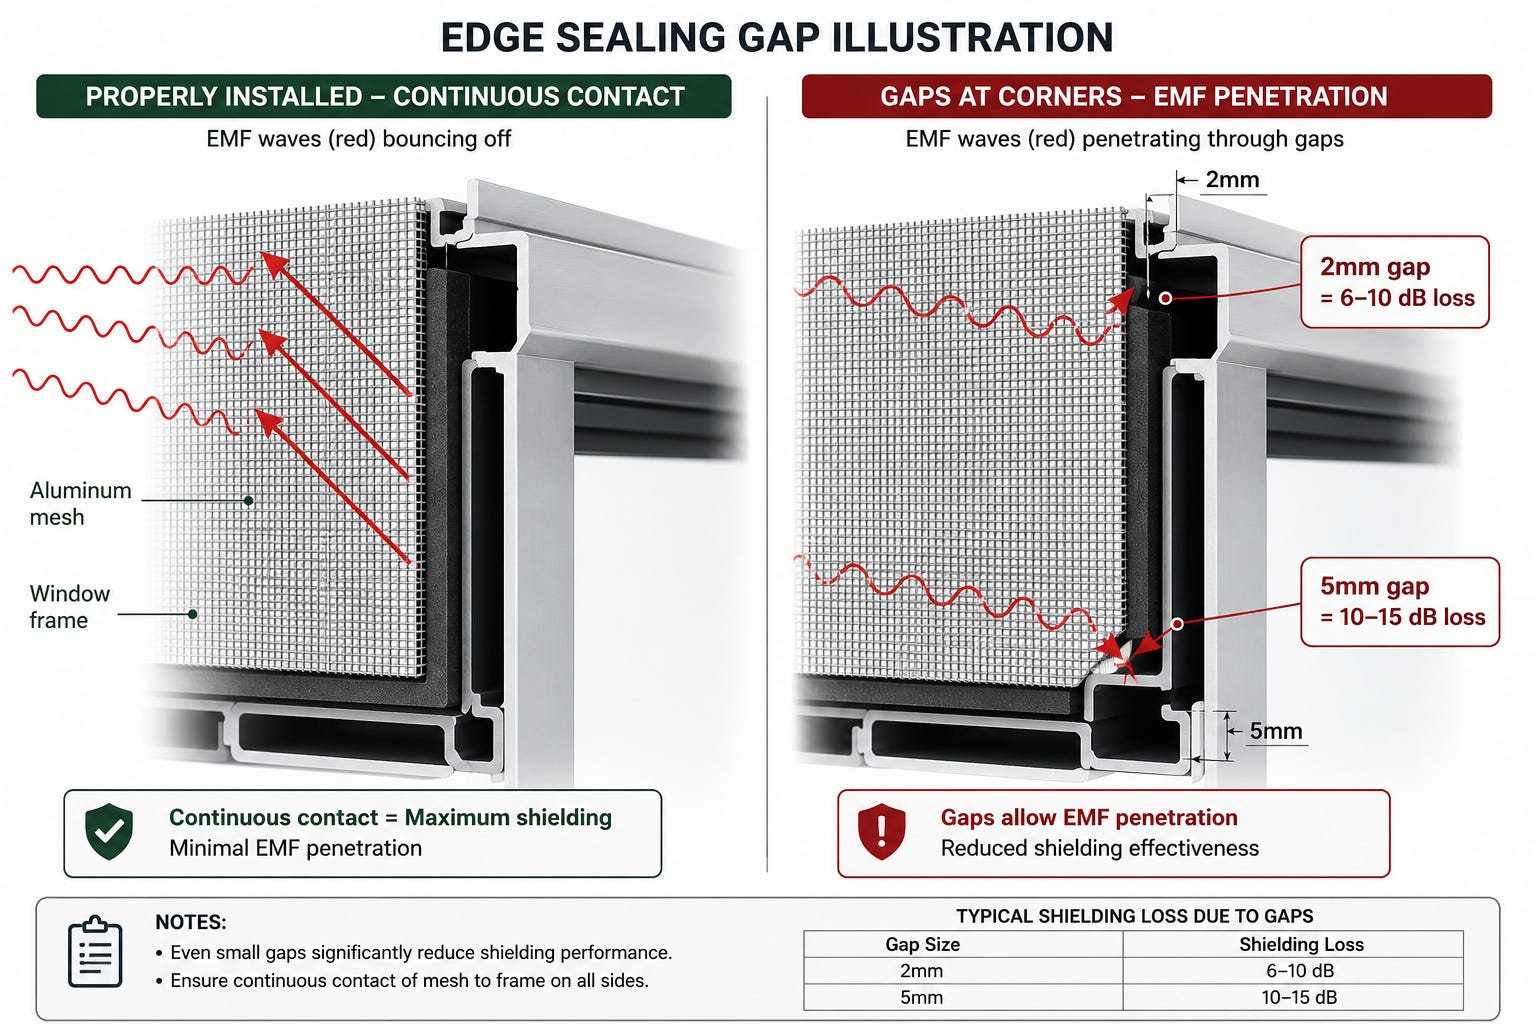
Installation: Edge Sealing Is Everything
The most important principle in EMF shielding is one most guides understate: gaps destroy effectiveness. A 2mm gap at the frame edge can cost you 6–10 dB. A 5mm gap loses 10–15 dB. That can turn a 30 dB solution into a 20 dB one before you’ve even finished installing it. A perfect material with poor edge sealing will be outperformed by a mediocre material with excellent edge sealing.
Source: Celozzi, Araneo & Lovat (2008); IEEE Std 299-2006.
For aluminum fly screen mesh:
The mesh must make continuous metallic contact with the frame on all sides
Overlap joins by at least 20mm; use conductive tape or clamps
Seal the frame-to-wall junction with aluminum foil tape (conductive adhesive — not duct tape)
Fill corner gaps with conductive caulk or aluminum tape
Optional: connect the frame to building earth ground for 3–6 dB additional gain at lower frequencies (only if you understand proper earthing)
For EMF window films:
Film must reach within 1–2mm of the frame on all sides
Use the manufacturer’s conductive edge tape — without it you lose the electrical seal and sacrifice 30–50% of rated attenuation
Each pane in a multi-pane window needs individual coverage
For shielding fabric curtains:
Extend fabric at least 150–200mm past the window frame on all sides
Drape against the wall surface; use magnetic strips or velcro to hold it flat
Double layers (with a 20–50mm air gap between them) can push attenuation to 40–50 dB
Beyond Windows: The Rest of the Envelope
Once windows are addressed, the remaining weak points are doors, roof, and penetrations — in that order of typical impact.
External Doors
Doors vary enormously. A hollow-core interior door offers almost nothing (2–4 dB), while an aluminium security screen door — extremely common in US and Australian homes — provides 12–25 dB on its own. If you already have one, inspect it: check the mesh for damage and make sure the frame closes tightly with no gaps. If you don’t have one, adding a standard aluminium security screen door costs $100–270 installed and delivers both security and meaningful EMF attenuation.
Roof
A metal roof (steel cladding, Colorbond, Zincalume) is already providing 20–40+ dB of attenuation from above — combined with brick walls, your main remaining vulnerability in such a home genuinely is just the windows and doors. Tile roofs with foil sarking give moderate protection. Tile roofs without sarking are the weakest configuration, but adding aluminium foil sarking is a straightforward, inexpensive fix — a standard building product at around $2–5/m² that also improves thermal performance.
Gaps and Penetrations
Once the major surfaces are addressed, these small openings become the next bottleneck. Walk through your home with your meter after completing the window and door work — any remaining hot spots will point directly to the next thing to fix.
Internal Sources
Often simpler to address than external shielding. Your Wi-Fi router, DECT cordless phone, and smart meter are all transmitting inside the perimeter you’ve just worked to protect. Wired ethernet, turning off the router at night, and shielding the interior wall behind a smart meter are all zero or near-zero cost interventions that can meaningfully reduce your actual exposure.
Priority Action Plan
The sequence below is ordered by impact per dollar — starting with measurement so you know what you’re actually dealing with, then working through the interventions that move the needle most.
Budget guide for windows specifically:
Under $65 total: Aluminum fly screen mesh on your worst 2–3 windows
$65–330: Low-E window film professionally installed on priority windows, mesh on the rest
$330–1,350: Purpose-built EMF film or Swiss Shield curtains on all exposed windows, plus door assessment and gap sealing
$1,350+: Full envelope treatment with professional verification
A Note on What We Can and Cannot Claim
Shielding works. The physics is clear, the measurements are repeatable, and the materials are well-characterised. Put a conductive barrier between yourself and an RF source, and field strength on your side drops. This is basic electromagnetic engineering confirmed by a century of practice.
What we can responsibly claim:
✅ Measurable reductions in RF field strength — because we can measure, document, and reproduce them
✅ Specific materials provide specific attenuation — tested under controlled conditions, published in peer-reviewed literature and standards
✅ Reducing exposure is a reasonable precautionary step — the precautionary principle is well-established in public health, and bodies including the European Parliament and BioInitiative Working Group have called for reduced exposure limits
What we should be cautious about: claiming specific health improvements. Individual responses vary, and many factors affect health. Document your experience honestly — including what didn’t change.
The strongest position is one grounded in measurement. Take readings. Document results. Share real numbers. Let the data speak.
Quick Reference: Decision Flowchart
1. What are my walls made of?
Brick / concrete / brick veneer → Walls providing 8–25 dB. Windows are your priority.
Weatherboard / timber → Only 2–5 dB from walls. Address windows first, but plan for wall treatment.
2. What is my roof?
Metal (Colorbond, steel cladding) → 20–40+ dB. No action needed above.
Tile with foil sarking → 5–12 dB. Adequate for most.
Tile without sarking → Weak point. Add foil sarking as a secondary priority.
3. Do I have aluminium security screen doors?
Yes → Already providing 12–25 dB. Inspect for gaps and mesh integrity.
No → Consider adding them (security + EMF reduction, ~$100–270 installed).
4. Which direction is the strongest signal coming from? Use your meter near each exterior wall and window. Focus first on windows facing the source. You may not need to shield every window — just the ones facing the tower.
5. What’s my budget? See the budget guide in the action plan above.
References
Standards
ITU-R P.2040-2 (2022) — Effects of Building Materials and Structures on Radiowave Propagation above ~100 MHz
IEEE Std 299 (2006) — Standard Method for Measuring Electromagnetic Shielding Effectiveness
ASTM D4935-10 — Standard Test Method for Measuring Electromagnetic Shielding Effectiveness of Planar Materials
Academic
Celozzi, S., Araneo, R. & Lovat, G. (2008) — Electromagnetic Shielding, Wiley-Interscience
Leferink, F. et al. (2006) — “Shielding Effectiveness Measurements Using a Reverberation Chamber”
Rodriguez, I. et al. (2014) — “An Empirical Study of Building Entry Loss Model for 0.8–18 GHz”, Aalborg University
Stone, W.C. (1997) — NIST Technical Note 1550, “Electromagnetic Signal Attenuation in Construction Materials”
Government / Regulatory
Ofcom (2014) — “Building Materials and Propagation”
BioInitiative Working Group (2012, updated 2020) — BioInitiative Report
Manufacturers
YSHIELD GmbH (Germany) — yshield.com
Swiss Shield AG (Switzerland) — swissshield.ch
Signals Defence LLC (USA) — signalsdefense.com
Geovital Academy (Austria/Australia) — geovital.com
Measurement Equipment
Cornet Microsystems — ED88TPlus5G, ED78SPlus5G
TinySA Ultra — handheld spectrum analyser
RF Explorer — Handheld spectrum analyser series
GET EDUCATED!
Check out my latest project

Nano Tech | Targeting | Directed Energy | Mind Control | Transhumanism and more!

RELATED POSTS
Protect yourself from EMF with Water!

By law of Nature, balance reigns
To heal the earth of all it’s pains
Hell-fires of the highest order
Will consecrate in God’s Pure Water!
— Gecko Pico, 2024
Thanks for your information. I still have never found anything that helps as much as the Harmonizer tools from @Leah Allen . Especially with the new tool specific for the extremely dangerous Fiber optic. You should reach out to her.
Once you start shielding you never stop. That has been my experience.